수많은 서비스가 이메일 인증을 사용하고 있다. Laravel도 5.7부터 이 기능을 옵션으로 제공하고 있다. 이 글에서는 Laravel에서 어떻게 이메일 인증을 사용할 수 있는지, 이메일 인증이 어떤 원리로 동작하는지 살펴보고자 한다.
이메일 인증 활성화
이메일 인증은 기본 기능이 아니라 옵션으로 제공하고 있다. 이를 활성화 하는 방법은 공식 문서에 상세히 나와 있다.
User 모델 설정
이메일 인증을 활성화하기 위해서는 User 모델이 아래와 같이 Illuminate\Contracts\Auth\MustVerifyEmail 인터페이스를 구현하도록 해야 한다.
<?php

namespace App;

use Illuminate\Notifications\Notifiable;
use Illuminate\Contracts\Auth\MustVerifyEmail;
use Illuminate\Foundation\Auth\User as Authenticatable;

class User extends Authenticatable implements MustVerifyEmail
{
    use Notifiable;

    // ...
}
email_verified_at 필드
이메일 인증을 받은 일시를 기록하기 위해 User 테이블에 email_verified_at 필드가 필요하다. Laravel 5.7 이후에 개발을 시작했다면
php artisan migrate을 실행하는 것만으로 User 테이블에 email_verified_at 필드를 생성할 수 있다.
라우트 추가
이메일 인증을 처리하는 컨트롤러는 Auth\VerificationController인데 관련 라우트를 추가하기 위해 아래와 같이 ['verify' => true]를 추가해 준다.
Auth::routes(['verify' => true]);['verify' => true]를 추가하기 전과 후의 라우트 목록을 보면 그 차이를 알 수 있다.
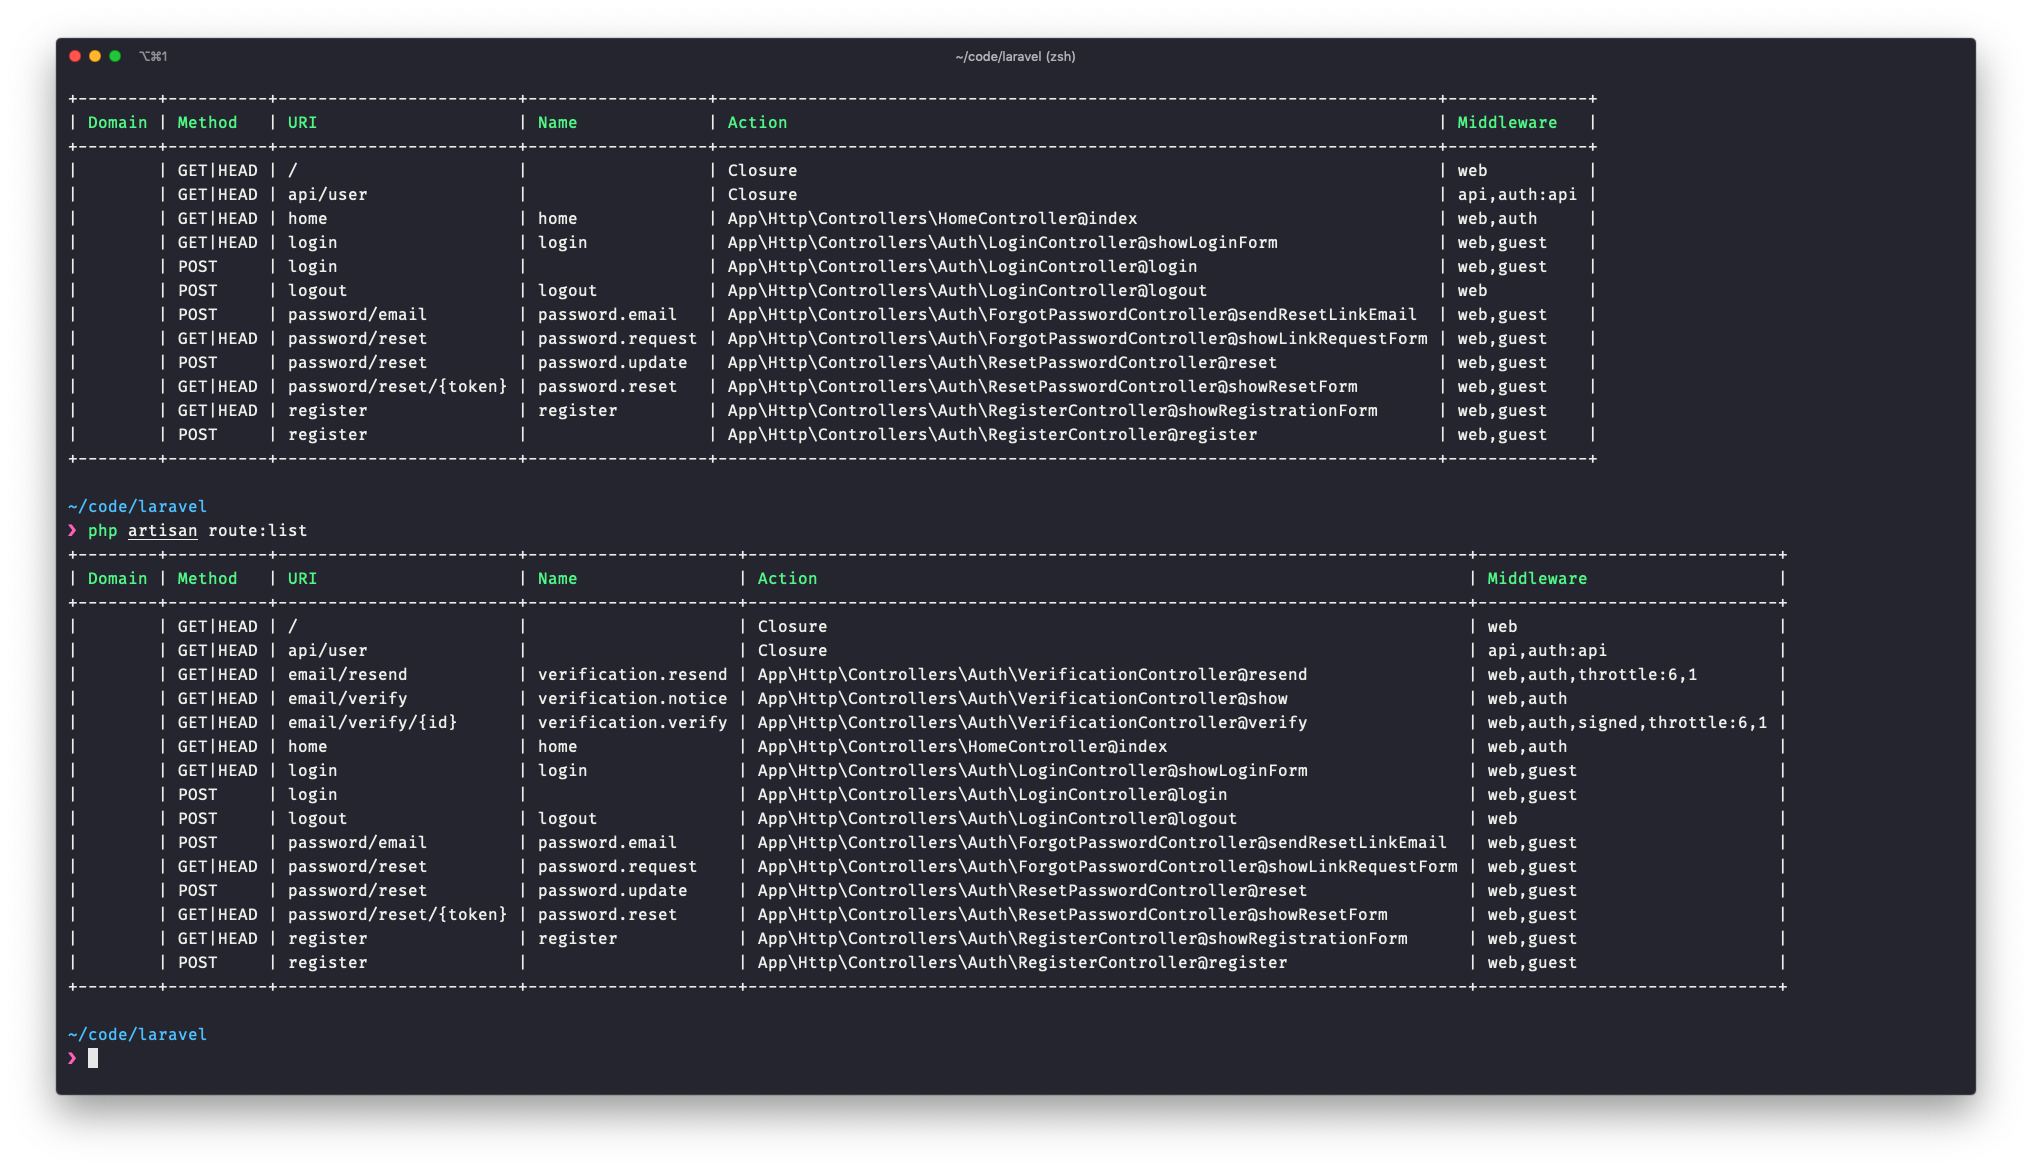
위 이미지를 보면 다음과 같이 3개의 이메일 인증 관련 라우트가 추가되었다.
| GET|HEAD | email/resend      | verification.resend | ...\VerificationController@resend  | web,auth,throttle:6,1        |
| GET|HEAD | email/verify      | verification.notice | ...\VerificationController@show    | web,auth                     |
| GET|HEAD | email/verify/{id} | verification.verify | ...\VerificationController@verify  | web,auth,signed,throttle:6,1 |
차례대로 다음과 같은 역할을 담당한다.
- 인증 이메일 재전송
- 이메일 인증을 해야 다음 단계로 넘어갈 수 있다고 안내하는 뷰
- 이메일 인증 처리
이메일 인증을 사용하면 verified 미들웨어를 통해 이메일 인증을 받지 않은 사용자가 페이지에 접근할 수 없도록 할 수 있다. 예를 들어 Laravel에서 로그인 후 기본으로 이동하는 /home 페이지의 기본 모습은 다음과 같은데
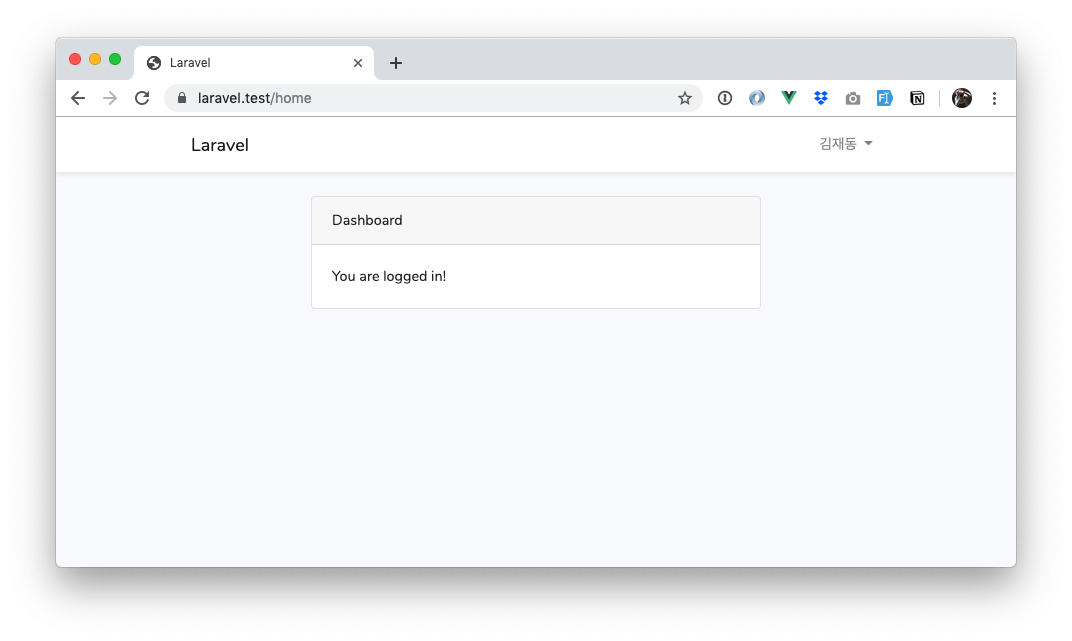
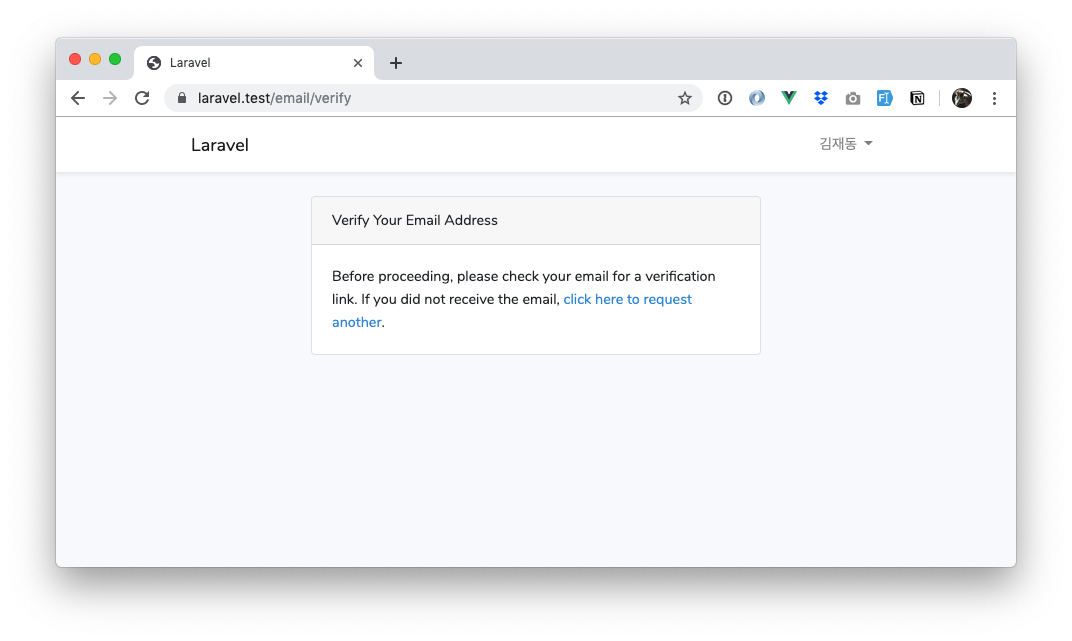
Route::get('/home', 'HomeController@index')->name('home')->middleware('verified');web.php에서 verified 미들웨어를 위와 적용시키면 /home으로 접속해도 이메일 인증을 받지 않은 사용자에게는 아래와 같은 화면이 보인다.
이메일 인증의 동작 원리
이메일 인증 링크가 포함된 이메일은 크게 2가지 방법으로 발송된다.
- 회원 가입을 했을 때
- 인증 이메일 다시 보내기 링크에 접근했을 때
인증 이메일 발송
이메일 인증을 활성화한 상태에서 회원 가입을 하면 Registered 이벤트가 발생하고 인증 이메일이 자동으로 발송된다.(회원 가입 로직에 대한 자세한 내용은 Laravel 회원 가입 컨트롤러(RegisterController)의 로직 살펴보기 참고)
이 때 발송되는 이메일은 Illuminate\Auth\Notifications\VerifyEmail 클래스에서 처리한다. Notification에서 어떤 방식으로 알림을 보내는지는 via 메서드를 통해서 결정하는데 이메일을 통해 전송하도록 하고 있다.
public function via($notifiable)
{
    return ['mail'];
}
구체적인 이메일 전송은 toMail 메서드가 담당한다. toMail 메서드를 살펴보면 다음과 같다.
public function toMail($notifiable)
{
    $verificationUrl = $this->verificationUrl($notifiable);

    if (static::$toMailCallback) {
        return call_user_func(static::$toMailCallback, $notifiable, $verificationUrl);
    }

    return (new MailMessage)
        ->subject(Lang::getFromJson('Verify Email Address'))
        ->line(Lang::getFromJson('Please click the button below to verify your email address.'))
        ->action(Lang::getFromJson('Verify Email Address'), $verificationUrl)
        ->line(Lang::getFromJson('If you did not create an account, no further action is required.'));
}
여기서 이메일의 제목, 내용, 버튼 링크 등을 결정해서 이메일을 전송한다. 전송된 이메일은 다음과 같은 형태이다.
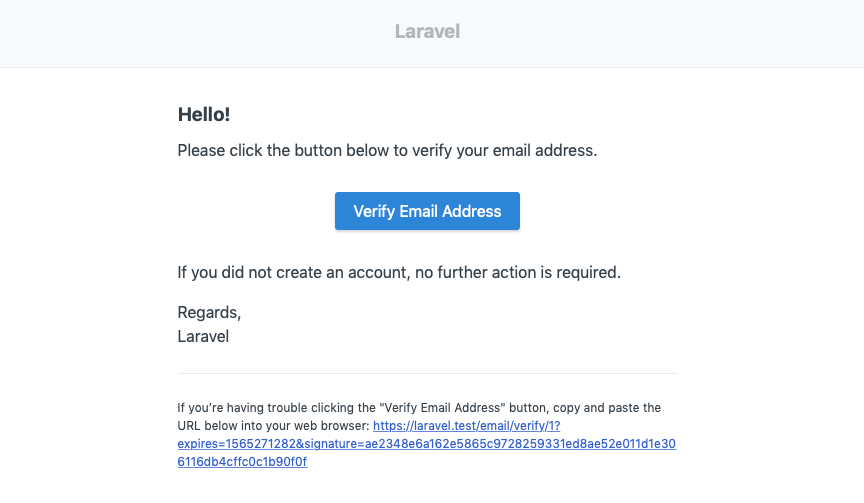
인증 이메일의 핵심은 이미지 아래쪽에 보이는 링크다. Verify Email Address 버튼도 정확히 아래에 있는 링크로 연결된다.
링크는 다음과 같은 형태로 되어 있다.
https://laravel.test/email/verify/1?expires=1565271282&signature=ae2348e6a162e5865c9728259331ed8ae52e011d1e306116db4cffc0c1b90f0f
/email/verify는 이메일 인증을 처리하는 라우트다.- 뒤에 1은 인증을 처리할
User의id값이다. - 쿼리스트링의
expires는 인증 링크가 유효한 일시를 unix time으로 나타낸 timestamp 값이다. signature는 이 인증 링크가 유효한지를 판단할 수 있는 서명 hash 값이다.
나는 처음에 이메일 인증을 위해서 signature 값을 DB 어디엔가 저장해 두고 verify 컨트롤러에서 이를 비교한 후 처리하는 줄 알았다. 그러나 DB 어디를 살펴봐도 이메일 인증을 위해 hash 값을 저장하는 곳은 없었다. 그렇다면 이메일 인증은 도대체 어떤 원리로 작동하는 것일까?
서명된 URL
이메일을 발송하는 Illuminate\Auth\Notifications\VerifyEmail 클래스에서 URL을 생성하는 부분을 다시 살펴보자.
$verificationUrl = $this->verificationUrl($notifiable);verificationUrl 메서드가 바로 위의 URL을 생성해서 되돌려 준다. verificationUrl을 살펴보면
/**
* Get the verification URL for the given notifiable.
*
* @param  mixed  $notifiable
* @return string
*/
protected function verificationUrl($notifiable)
{
    return URL::temporarySignedRoute(
        'verification.verify',
        Carbon::now()->addMinutes(Config::get('auth.verification.expire', 60)),
        ['id' => $notifiable->getKey()]
    );
}
이메일 인증을 위해 Laravel의 서명된 URL 기능을 사용하고 있다. 서명된 URL은 이메일 구독 취소처럼 인터넷상에 완전히 공개된 링크지만 링크를 가진 사람만 접근할 수 있도록 해야할 때 유용하다. AWS의 CloudFront나 S3의 서명된 URL과도 정확히 같은 역할을 한다.
위에서는 임시 서명 주소를 생성하는데 앞서 언급한 것처럼 인증 링크가 만료되는 시점을 지정할 수 있다.
verification.verify는 이메일 인증 링크가 유효한지 검사하는 컨트롤러의 라우트 이름이다.config/auth.php에verification => expire값이 지정되어 있다면 그 값을 사용하고 그렇지 않다면 기본적으로 60(분)을 사용한다.id값으로$notifiable->getKey()즉, 사용자의id가 들어간다.
여기서 서명된 URL의 원리까지 살펴보기에는 글이 너무 길어지므로 이것은 다음 기회에 살펴보도록 하고 서명된 URL을 어떻게 처리하는지 VerificationController를 살펴보도록 하자.
VerificationController
인증 링크가 유효한지 검사하고 이메일 인증 처리를 하는 Action은 Auth\VerificationController@verify이다. 그런데 VerificiationController에는 verify라는 메서드가 존재하지 않는다. 이 컨트롤러가 사용하고 있는 VerifiesEmails trait에 존재하며 정확한 위치는 Illuminate\Foundation\Auth\VerifiesEmails이고 코드는 다음과 같다.
/**
* Mark the authenticated user's email address as verified.
*
* @param  \Illuminate\Http\Request  $request
* @return \Illuminate\Http\Response
* @throws \Illuminate\Auth\Access\AuthorizationException
*/
public function verify(Request $request)
{
    if ($request->route('id') != $request->user()->getKey()) {
        throw new AuthorizationException;
    }

    if ($request->user()->hasVerifiedEmail()) {
        return redirect($this->redirectPath());
    }

    if ($request->user()->markEmailAsVerified()) {
        event(new Verified($request->user()));
    }

    return redirect($this->redirectPath())->with('verified', true);
}
해석하면
$request의id값이request->user()의getKey()즉id값과 일치하지 않으면AuthorizationException을 발생시킨다. 쉽게 설명하면 URL에 존재하는id와 로그인 사용자의id가 일치하지 않으면 예외를 발생시킨다는 의미.- 사용자가 이미 이메일 인증을 완료한 경우에도 리다이렉트
markEmailAsVerified는 User 테이블의email_verified_at에 인증일시를 기록하는데 코드는hasVerifiedEmail과 마찬가지로Illuminate\Auth\MustVerifyEmailtrait에 존재하며 코드는 아래와 같다. 인증 일시를 기록한 이후에는Verified이벤트를 발생시킨다.
/**
* Mark the given user's email as verified.
*
* @return bool
*/
public function markEmailAsVerified()
{
    return $this->forceFill([
        'email_verified_at' => $this->freshTimestamp(),
    ])->save();
}
그런데 이상하게도 정작 서명된 URL을 확인하는 로직이 존재하지 않는다. 그 이유는 VerificationController의 constructor를 보면 알 수 있다.
/**
* Create a new controller instance.
*
* @return void
*/
public function __construct()
{
    $this->middleware('auth');
    $this->middleware('signed')->only('verify');
    $this->middleware('throttle:6,1')->only('verify', 'resend');
}
verify 액션에 signed 미들웨어를 적용하도록 하고 있다. 따라서 verify를 수행하기 전에 이미 signed 미들웨어를 통해 서명된 URL을 점검하는 것이다. Laravel의 미들웨어는 app/Http/Kernel.php에 등록되어 있는데 파일을 확인해 보면 signed 라우트 미들웨어는 다음과 같이 정의되어 있다.
/**
    * The application's route middleware.
    *
    * These middleware may be assigned to groups or used individually.
    *
    * @var array
    */
protected $routeMiddleware = [
    ...
    'signed' => \Illuminate\Routing\Middleware\ValidateSignature::class,
    ...
    'verified' => \Illuminate\Auth\Middleware\EnsureEmailIsVerified::class,
];
\Illuminate\Routing\Middleware\ValidateSignature 미들웨어의 handle 메서드는 다음과 같이 되어 있다.
/**
* Handle an incoming request.
*
* @param  \Illuminate\Http\Request  $request
* @param  \Closure  $next
* @return \Illuminate\Http\Response
*
* @throws \Illuminate\Routing\Exceptions\InvalidSignatureException
*/
public function handle($request, Closure $next)
{
    if ($request->hasValidSignature()) {
        return $next($request);
    }

    throw new InvalidSignatureException;
}$request->hasValidSignature()를 통해 request의 signature가 제대로 되어있는지 확인한다. $request->hasValidSignature()의 동작원리는 마찬가지로 다음 기회에 상세히 다뤄보도록 하겠다.
verified 미들웨어
verified 미들웨어는 이메일 인증을 받지 않았다면 특정 라우트로 리다이렉트하는 역할을 한다. app/Http/Kernel.php를 살펴보면 다음과 같이 정의되어 있다.
/**
    * The application's route middleware.
    *
    * These middleware may be assigned to groups or used individually.
    *
    * @var array
    */
protected $routeMiddleware = [
    ...
    ...
    'verified' => \Illuminate\Auth\Middleware\EnsureEmailIsVerified::class,
];\Illuminate\Auth\Middleware\EnsureEmailIsVerified의 handle 메서드는 다음과 같다.
public function handle($request, Closure $next, $redirectToRoute = null)
{
    if (! $request->user() ||
        ($request->user() instanceof MustVerifyEmail &&
        ! $request->user()->hasVerifiedEmail())) {
        return $request->expectsJson()
                ? abort(403, 'Your email address is not verified.')
                : Redirect::route($redirectToRoute ?: 'verification.notice');
    }

    return $next($request);
}
해석을 해보면
$request->user()가 존재하지 않거나$request->user()가MustVerifyEmail타입의 인스턴스(즉, 이메일 인증을 사용하지만)이지만 아직 인증을 받지 않았다면- JSON 형태로 요청을 했다면
403코드만 반환하고 그렇지 않다면$redirectToRoute로 리다이렉트 한다. 만약$redirectToRoute가null이면 이메일 인증 라우트에 정의된verification.notice로 리다이렉트 한다.
중간에 hasVerifiedEmail()는 이메일을 인증 받았는지 여부를 확인하는 메서드인데 Illuminate\Auth\MustVerifyEmail trait에 정의되어 있다.
/**
    * Determine if the user has verified their email address.
    *
    * @return bool
    */
public function hasVerifiedEmail()
{
    return ! is_null($this->email_verified_at);
}
hasVerifiedEmail 메서드는 User 모델에서 실행되기 때문에 $this->email_verified_at 즉, User 테이블의 email_verified_at 컬럼이 null이 아니라면 true를 반환하고 그렇지 않다면 false를 반환한다.
그런데 User모델에서 구현(implement)하도록한 Illuminate\Contracts\Auth\MustVerifyEmail는 인터페이스라 메서드의 구현부가 존재하지 않는데 어떻게 이 trait를 사용하게 되었는지 궁금할 수도 있다. User 모델의 상단을 살펴보면 아래와 같이 User 모델 클래스가 Authenticatable을 상속하고 있다는 것을 알 수 있다.
namespace App;

use Illuminate\Notifications\Notifiable;
use Illuminate\Contracts\Auth\MustVerifyEmail;
use Illuminate\Foundation\Auth\User as Authenticatable;

class User extends Authenticatable implements MustVerifyEmail
{Authenticatable은 곧 Illuminate\Foundation\Auth\User를 뜻하는데 여기서 MustVerifyEmail trait를 사용하도록 선언한다.
class User extends Model implements
    AuthenticatableContract,
    AuthorizableContract,
    CanResetPasswordContract
{
    use Authenticatable, Authorizable, CanResetPassword, MustVerifyEmail;
}
정리
Laravel의 이메일 인증은
- 회원 가입을 할 때 발생하는
Registered이벤트나 재전송 URL을 통해 발송된다. - 서명된 URL과
verified,signed미들웨어,VerificationController이용해 구현하고 있다. - 서명된 URL은 URL이 유효한지 확인하는 역할을 하며
temporarySignedRoute의 경우 링크가 만료되는 시점도 지정할 수 있다. signed미들웨어는 URL의 서명이 유효한지를 확인한다.verified미들웨어는 사용자가 이메일 인증을 받았는지 확인하고 받지 않았을 경우 지정된 곳으로 리다이렉트한다.