Laravel에는 회원 가입, 로그인, 비밀번호 찾기 등 사용자 인증 기능이 기본적으로 탑재되어 있다. 프로젝트 루트 디렉토리에서 php artisan make:auth를 하면 이를 담당하는 컨트롤러와 뷰, 라우트 등이 생성된다. 이번 글에서는 그 중에서도 회원 가입을 처리하는 RegisterController의 register 메서드에 대해서 자세히 알아보자.
먼저 php artisan make:auth를 한 후 라우트 리스트를 살펴보자.
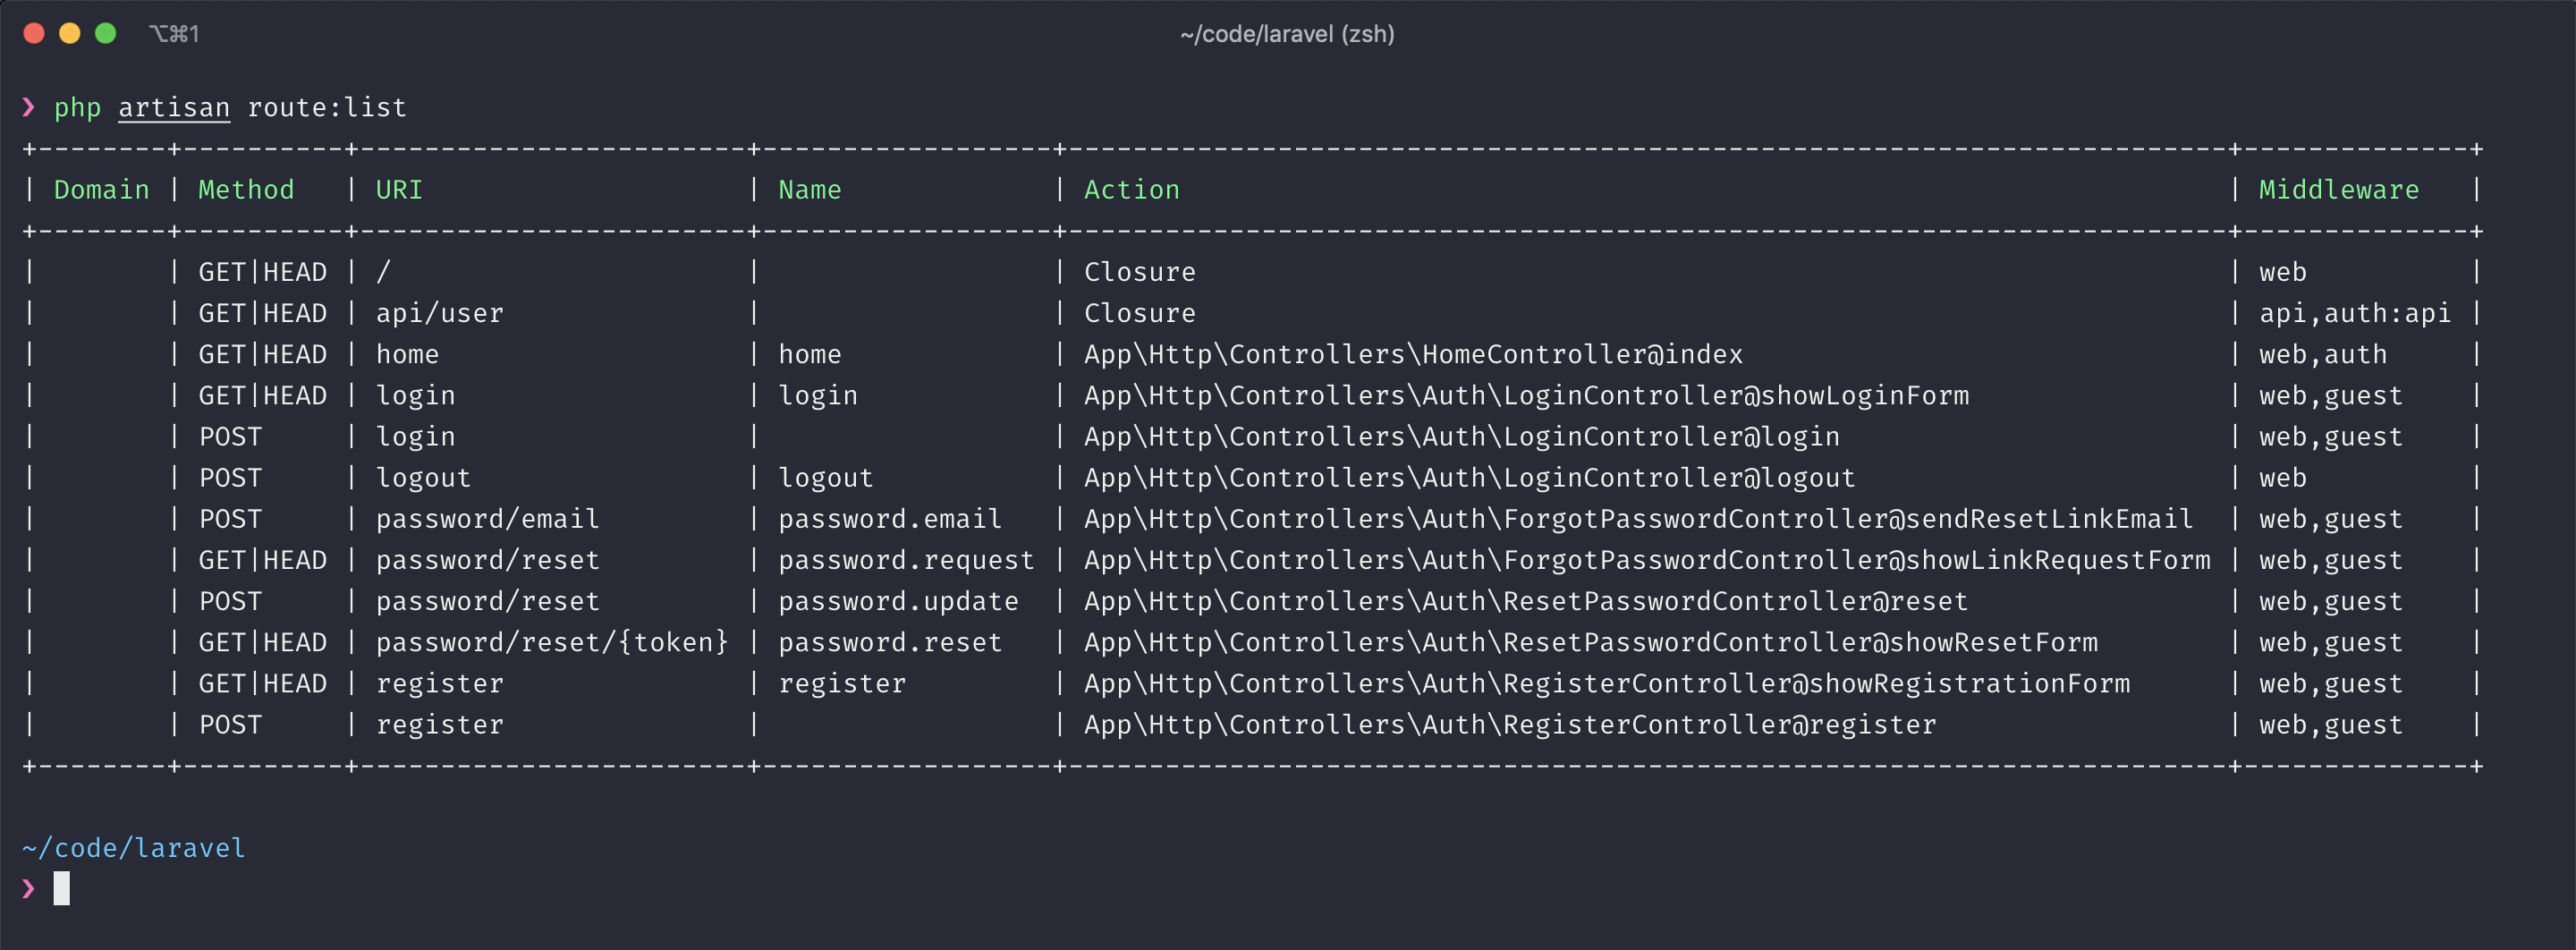
제일 아래 쪽의 2개가 회원 가입과 관련된 라우트다. /register로 접근하면 회원 가입 폼이 보이고 여기서 POST 요청을 보내면 회원 가입이 처리된다. 라우트 목록을 보니 Auth\RegisterController@register가 이를 담당하고 있다.
하지만 실제로 RegisterController에 가보면 register 메서드는 존재하지 않고 아래 그림과 같이 멤버가 정의되어 있다.
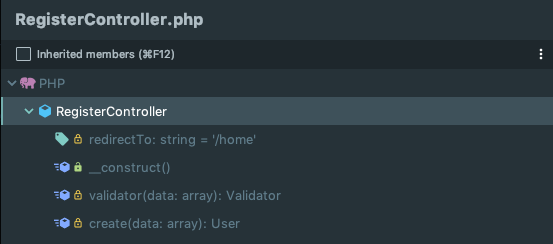
RegisterController의 코드 상단에 보면 아래와 같이 RegistersUsers라는 trait를 사용하고 있는데 register 메서드는 여기에 존재한다.
use RegistersUsers;RegistersUsers trait의 register 메서드는 다음과 같다.
/**
* Handle a registration request for the application.
*
* @param \Illuminate\Http\Request $request
* @return \Illuminate\Http\Response
*/
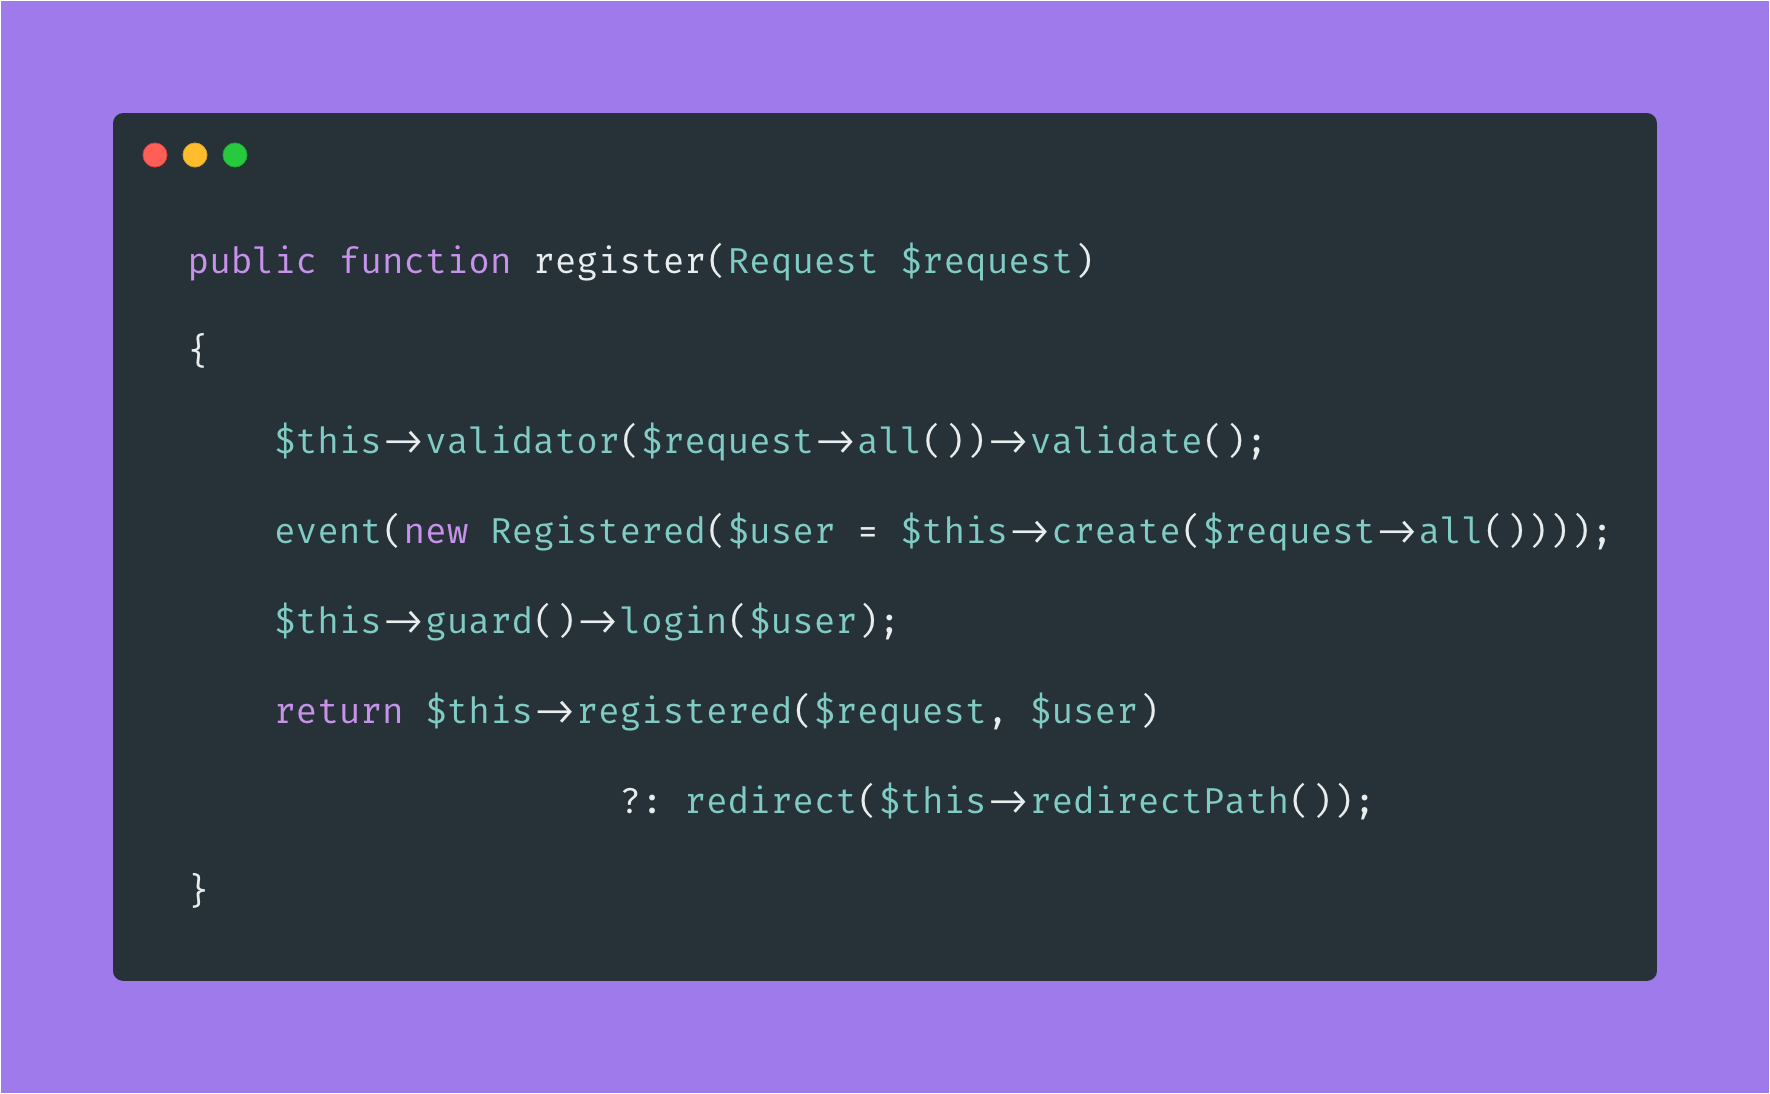
public function register(Request $request)
{
$this->validator($request->all())->validate();
event(new Registered($user = $this->create($request->all())));
$this->guard()->login($user);
return $this->registered($request, $user)
?: redirect($this->redirectPath());
}이 코드를 하나씩 뜯어보자.
유효성 검사
먼저 회원 가입 폼에 입력한 정보가 유효한지 validator 메서드를 이용해 검사한다. 이 메서드는 RegisterController에 있다.
/**
 * Get a validator for an incoming registration request.
 *
 * @param  array  $data
 * @return \Illuminate\Contracts\Validation\Validator
 */
protected function validator(array $data)
{
    return Validator::make($data, [
        'name' => ['required', 'string', 'max:255'],
        'email' => ['required', 'string', 'email', 'max:255', 'unique:users'],
        'password' => ['required', 'string', 'min:8', 'confirmed'],
    ]);
}
보통 Laravel에서는 $request->validate() 또는 request()->validate()과 같이 validate 메서드를 통해 손쉽게 유효성 검사를 할 수 있는데 여기서는 Validator Facade를 이용해서 수동으로 Validator 인스턴스를 만들어냈다. RegistersUsers trait는 Framework에 포함되어 있어서 사용자의 필요에 따라 유효성 검사를 손쉽게 수정하기 위해 이런 방식으로 코드를 작성한 것 같은데 어차피 validator 메서드의 인자로 $request->all() 대신 $request를 통째로 넘겨줬다면 $request->validate()을 사용해 유효성 검사를 할 수도 있었을 것이다. 아무튼 여기서 상황에 맞게 유효성 검사 규칙을 정의하면 된다.
회원 가입 이벤트 발생
event(new Registered($user = $this->create($request->all())));두 번째 줄에서는 Registered라는 이벤트를 발생시키는데 $this->create($request->all())를 이용해 새로운 사용자를 DB에 저장한 후 그 결과 값을 인자로 넘겨준다. $this->create() 역시 RegisterController에 정의되어 있기 때문에 상황에 맞게 얼마든지 변경이 가능하다.
/**
 * Create a new user instance after a valid registration.
 *
 * @param  array  $data
 * @return \App\User
 */
protected function create(array $data)
{
    return User::create([
        'name' => $data['name'],
        'email' => $data['email'],
        'password' => Hash::make($data['password']),
    ]);
}
위와 같이 create 메서드를 이용해 사용자를 생성하고 앞서 이야기한 것처럼 이를 Registered 이벤트로 전달한다. 참고로 Registered 이벤트는 Illuminate\Auth\Events에 존재한다.
프로그램에서 중요하고 의미있는 순간마다 이렇게 이벤트를 발생시킬 수 있다. 그리고 필요에 따라 특정 이벤트를 감시하고 있다가 이벤트가 발생하면 코드를 실행하는 디자인 패턴이 있는데 이런 패턴을 옵저버 패턴이라고 한다. Laravel에서도 옵저버 패턴을 Event와 Listener를 통해 구현하고 있다. 보통 이벤트는 EventServiceProvider의 listen 속성에 등록을 하는데 Laravel 5.8.9부터는 이벤트를 자동으로 등록하는 Event Discovery 기능이 추가되었다. 자세한 내용은 Laravel 이벤트 문서를 참고해 보자.
Registered 이벤트와 관련된 리스너는 친절하게도 EventServiceProvider에 아래와 같이 등록이 되어 있다.
/**
 * The event listener mappings for the application.
 *
 * @var array
 */
protected $listen = [
    Registered::class => [
        SendEmailVerificationNotification::class,
    ],
];
Registered 이벤트를 관장하고 있는 리스너 클래스는 SendEmailVerificationNotification으로 Illuminate\Auth\Listeners에 위치해 있다. Laravel에서 이벤트에 리스너를 등록하면, 이벤트가 발생했을 때 등록된 리스너의 handle() 메서드를 실행한다. SendEmailVerificationNotification의 handle 메서드는 다음과 같다.
/**
 * Handle the event.
  *
  * @param  \Illuminate\Auth\Events\Registered  $event
  * @return void
  */
 public function handle(Registered $event)
 {
     if ($event->user instanceof MustVerifyEmail && ! $event->user->hasVerifiedEmail()) {
         $event->user->sendEmailVerificationNotification();
     }
}handle()의 인자를 보면 Registered $event로 type hint가 되어 있는데 이렇게 되어 있으면 EventServiceProvider에서 굳이 등록을 하지 않더라도 Registered 이벤트가 발생했을 때 자동으로 실행된다.(단, listener 클래스가 Listeners 디렉토리 안에 존재해야 하고 Laravel 5.8.9 이상.) register 메서드에서 event()로 이벤트를 발생시키면서 인자로 생성한 사용자를 넘겨주었기 때문에 이 리스너에서 $event->user를 통해 새로 가입된 사용자에 대한 정보를 확인할 수 있다. 여기서는 이메일 인증을 사용하도록 했을 때 인증 이메일을 발송하도록 하고 있다. sendEmailVerificationNotification 메서드는 user 인스턴스를 통해 실행하는데, User.php에 가봐도 sendEmailVerificationNotification은 존재하지 않는다.
use Illuminate\Foundation\Auth\User as Authenticatable;

class User extends Authenticatable
User 모델은 위와 같이 Authenticatable이라는 클래스를 상속받는데 Authenticatable은 Illuminate\Foundation\Auth\User의 alias이다.
class User extends Model implements
    AuthenticatableContract,
    AuthorizableContract,
    CanResetPasswordContract
{
    use Authenticatable, Authorizable, CanResetPassword, MustVerifyEmail;
}Illuminate\Foundation\Auth\User를 살펴보면 위와 같이 MustVerifyEmail이라는 trait를 사용하는데 여기에 sendEmailVerificationNotification이 아래와 같이 정의되어 있다.
/**
 * Send the email verification notification.
 *
 * @return void
 */
public function sendEmailVerificationNotification()
{
    $this->notify(new Notifications\VerifyEmail);
}
최종적으로는 Illuminate\Auth\Notifications\VerifyEmail 메일 클래스에 인증 메일이 구현되어 있다. 따라서 이메일 인증 방법이나 이메일 문구 등을 바꾸고 싶다면 EventServiceProvider에 별도의 리스너를 등록하거나 User 모델에서 sendEmailVerificationNotification()을 override해서 별도의 Notification을 전송하면 된다. Laravel에서 이메일 인증을 활성화하는 방법과 이메일 인증의 원리에 대한 설명은 [Laravel 파헤치기] 이메일 인증을 참고하자.
로그인 처리
이제 DB에 새로운 사용자 정보가 저장되었기 때문에 이 정보를 이용해 로그인 처리를 한다.
$this->guard()->login($user);RegistersUsers trait의 guard 메서드를 살펴보면
/**
 * Get the guard to be used during registration.
 *
 * @return \Illuminate\Contracts\Auth\StatefulGuard
 */
protected function guard()
{
    return Auth::guard();
}Auth::guard()를 통해 기본 guard를 불러오고 있다. Laravel에는 기본적으로 web과 api guard가 config/auth.php 에 아래와 같이 정의되어 있다.
'guards' => [
    'web' => [
        'driver' => 'session',
        'provider' => 'users',
    ],

    'api' => [
        'driver' => 'token',
        'provider' => 'users',
        'hash' => false,
    ],
],
guard의 이름을 지정하지 않으면 기본 guard로 web이 설정되고 이 guard는 세션과 쿠기를 이용해 사용자의 인증과 관련된 처리를 담당한다. Illuminate\Auth\SessionGuard의 login 메서드가 실질적으로 로그인 처리를 한다.
등록 후 처리
return $this->registered($request, $user)
                    ?: redirect($this->redirectPath());
마지막으로 registered 메서드를 호출하고 redirectPath 메서드를 이용해 리다이렉트를 한다. registered는 RegistersUsers trait에 아래와 같이 빈 메서드로 존재하는데 등록이 완료된 이후에 어떤 처리를 원한다면 이곳에 코드를 작성하면 된다. 하지만 RegistersUsers는 프레임워크에 속해 있으니 직접 수정이 어려우므로 RegisterController에 같은 이름으로 override를 하면 된다.
/**
 * The user has been registered.
 *
 * @param  \Illuminate\Http\Request  $request
 * @param  mixed  $user
 * @return mixed
 */
protected function registered(Request $request, $user)
{
    //
}
삼항 연산 방식으로 되어 있기 때문에 registered 메서드가 true를 반환하지 않아야 redirect($this->redirectPath())가 실행된다. redirectPath 메서드는 RegistersUsers trait에서 사용하는 RedirectsUsers trait에 존재하는데 코드는 다음과 같다.
/**
 * Get the post register / login redirect path.
 *
 * @return string
 */
public function redirectPath()
{
    if (method_exists($this, 'redirectTo')) {
        return $this->redirectTo();
    }

    return property_exists($this, 'redirectTo') ? $this->redirectTo : '/home';
}RegisterController에 redirectTo라는 메서드가 존재하면 이걸 실행하고, redirectTo라는 속성이 있다면 그 값을 반환하고 그것도 없다면 기본 값으로 /home을 반환한다. 하지만 RegisterController에 보면 $redirectTo가 기본적으로 설정되어 있다.
/**
 * Where to redirect users after registration.
 *
 * @var string
 */
protected $redirectTo = '/home';
회원 가입 후에 /home이 아닌 다른 곳으로 이동하고 싶다면 이 값을 변경하면 된다.